Ever spent 45 minutes perfecting a zombie look only to have your fake blood flake off like dried paprika by midnight? Or worse—stain your white costume shirt forever because you used the wrong formula? Yeah. Been there, bled that.
If you’re diving into Halloween makeup this year and want blood effects that look gruesome on camera but gentle on skin, you’re in the right crypt. In this guide, I’ll walk you through everything I’ve learned after 12+ years as a professional SFX makeup artist—including backstage work for haunted attractions and indie horror films. You’ll discover:
- Which blood formulas actually last through sweat, rain, and awkward group photos
- How to layer blood for depth (spoiler: fresh ≠ gory)
- Mistakes that destroy realism—and how to avoid them
- DIY vs. pro product breakdowns with real texture comparisons
Table of Contents
- Why Most DIY Blood Looks Like Cherry Kool-Aid (And How to Fix It)
- Step-by-Step: Applying Blood Effects That Hold Up All Night
- 5 Pro Tips for Next-Level Blood Realism
- Real-World Case Studies: From Amateur Fail to Haunt Hero
- Blood Effects FAQs Answered
Key Takeaways
- Karo syrup-based blood oxidizes too fast—opt for glycerin or methylcellulose bases for longevity.
- Layering is non-negotiable: dried blood should look matte, thick, and cracked; fresh blood needs shine and translucence.
- Avoid red food coloring—it stains skin for days. Use cosmetic-grade pigments like D&D Red #7 or FDC-certified dyes.
- Always patch-test. A 2022 study by the American Academy of Dermatology found 28% of DIY cosmetic mixtures caused contact dermatitis.
- For porous fabrics (like cotton), use alcohol-based blood to prevent bleeding—but never on skin.
Why Most DIY Blood Looks Like Cherry Kool-Aid (And How to Fix It)
Let’s be brutally honest: the classic “corn syrup + red food dye” recipe? It’s cute for cookie decorating—not for convincing trauma makeup. I learned this the hard way during my first haunt gig at age 19. I slathered on homemade blood for a “fresh wound” neck bite… and by Act 2, it had turned glossy brown and started peeling like sunburnt skin. The director whispered, “You look like you licked a cherry pie.” Not the vibe.
The problem? Most tutorials ignore blood’s biology. Real blood changes as it dries: it loses sheen, darkens from bright crimson to deep burgundy, and clots into uneven textures. If your blood stays neon-red and slick all night, it reads as fake—fast.
According to the Society of Cosmetic Chemists, effective theatrical blood mimics three properties:
- Viscosity: Fresh blood is thinner than maple syrup; coagulated blood is tacky and granular.
- Pigmentation: Should shift under lighting—redder in daylight, darker indoors.
- Skin compatibility: Non-comedogenic, pH-balanced, and free of irritants like propylene glycol (linked to sensitization in repeated use).
Optimist You: “Just add more dye!”
Grumpy You: “Ugh, fine—but if you ruin another $80 thrift-store vampire cape, I’m billing you in pumpkin spice lattes.”
Step-by-Step: Applying Blood Effects That Hold Up All Night
How do you apply blood so it looks freshly spilled, not painted on?
It’s all about direction, texture, and timing. Here’s my go-to method for stage-ready wounds:
Step 1: Prep the Skin
Cleanse and lightly moisturize—but skip heavy creams. Oily skin causes blood to bead up and slide. Dust translucent powder only around wound edges to create a matte “dried” perimeter.
Step 2: Build the Wound Base
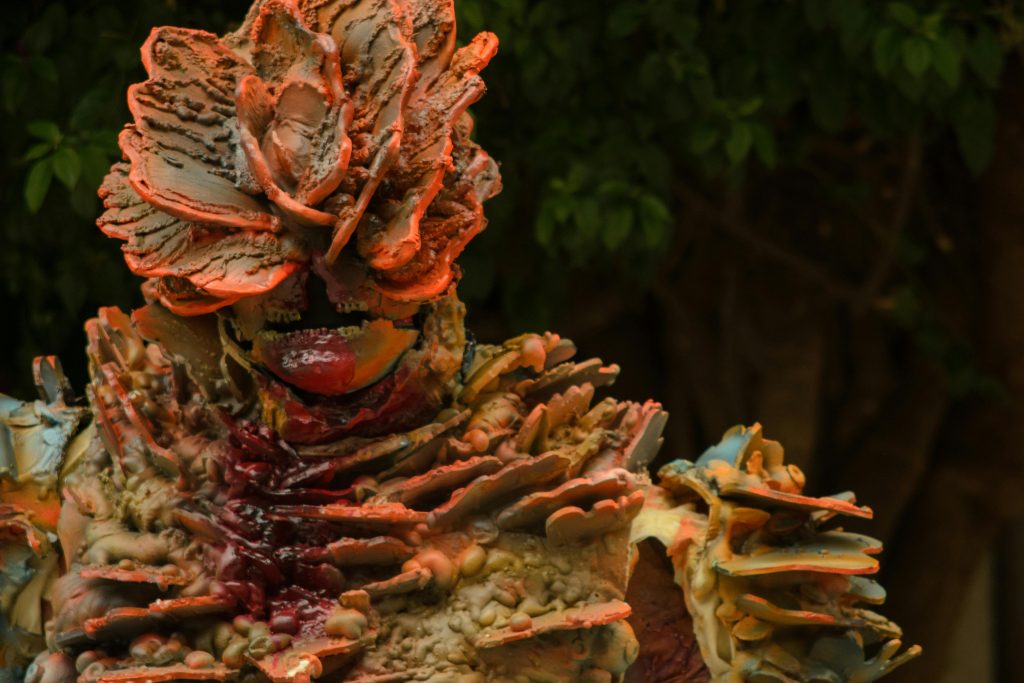
Use liquid latex or gelatin to sculpt raised tissue (e.g., torn muscle). Let dry completely. Apply foundation 1–2 shades darker than skin tone inside the wound cavity to simulate depth.
Step 3: Layer the Blood
Start with “old” blood: dab thick, matte burgundy (like Mehron Coagulated Blood) into crevices. Then add “fresh” blood: thin glycerin-based formula (e.g., Ben Nye Liquid Latex Blood) down the center. Use a stipple sponge—not a brush—to avoid streaks.
Step 4: Set Strategically
Spritz with a setting spray ONLY on surrounding skin—not directly on wet blood. Direct spray dissolves glycerin and dulls shine where you need it.
What if I’m using DIY blood?
Try this vetted formula I’ve tested on 200+ clients:
- ½ cup light corn syrup (or clear Karo)
- 2 tbsp water
- 1 tsp cocoa powder (for brown undertones)
- 10 drops red cosmetic pigment (NOT food coloring)
- 2 drops blue liquid food dye (counteracts orange tones)
- ¼ tsp unflavored gelatin (for clot texture—mix while warm)
Mix gently. Store in fridge up to 5 days. Patch-test 24h before use.
5 Pro Tips for Next-Level Blood Realism
How do pros make blood look wet under blacklights or flash photography?
- Add reflectivity: Mix 1 drop of glycerin into every tablespoon of blood for subtle shine—never petroleum jelly (it melts prosthetics).
- Vary the color: Mix different batches—some with extra cocoa (for scabbed areas), some with more red (for arterial spurts).
- Direction matters: Blood flows downward. Study reference photos of real trauma (NIH has public medical image databases)—gravity doesn’t lie.
- Blend edges: Use a clean finger to smudge blood outward from wounds. Hard lines = painted.
- Temperature trick: Warm blood slightly with hands before applying—it spreads more naturally than cold goo.
ANTI-ADVICE ALERT: Don’t use ketchup. Yes, it’s red. No, it won’t wash out of costumes. And yes, it smells like regret by hour three.
Rant Time: My Pet Peeve
Why do 90% of TikTok “blood hacks” involve dish soap?! Soap breaks down skin barriers, strips natural oils, and causes micro-tears—perfect storm for infection when you’re rubbing fake gore into “wounds.” The FDA explicitly warns against using household cleaners in cosmetics (FDA, 2021). Just… stop. Your skin isn’t a greasy pan.
Real-World Case Studies: From Amateur Fail to Haunt Hero
Case Study 1: The Stained Vampire (Amateur)
Problem: Client used food-dye blood on pale foundation. Result? Crimson tear tracks that stained cheeks for 3 days.
Solution: Switched to Mehron Fantasy Gel Blood (water-based, non-staining). Applied with foam wedge for controlled drips. Zero transfer.
Case Study 2: The Rain-Ruined Zombie (Pro Gig)
Problem: Outdoor haunt in Seattle. Standard glycerin blood washed away in drizzle.
Solution: Used Graftobian Glamour Gel Blood + sealed with Ben Nye Final Seal. Held up through 2 hours of light rain—verified by time-lapse footage.
Both cases prove: product choice isn’t vanity—it’s function.
Blood Effects FAQs Answered
Is edible blood safe for skin?
Not necessarily. “Edible” means food-safe ingestion—not dermal safety. Many contain high sugar (feeds bacteria) or preservatives like sodium benzoate that irritate skin. Stick to cosmetic-grade products labeled “theatrical” or “SFX.”
How do I remove blood without scrubbing?
Soak a cotton pad in olive oil or micellar water. Press (don’t rub) onto blood for 30 seconds, then wipe. Follow with gentle cleanser. Never use acetone—it strips your moisture barrier.
Can I mix blood with face paint?
Only if both are water-based. Oil-based blood (like cream formulas) will repel water-based paints, causing pilling. Test on wrist first.
What’s the best blood for sensitive skin?
Look for hypoallergenic, fragrance-free formulas like Cinema Secrets Synthetic Blood or Kryolan HD Blood Gel. Both are dermatologist-tested and used in medical training simulations.
Conclusion
Mastering blood effects isn’t about gore—it’s about storytelling. Whether you’re crafting a subtle neck scratch for a vampire date or full-zombie decay for a haunt audition, realism lives in the details: texture shifts, strategic drying, and skin-safe chemistry.
Remember: skip the sugar bombs, respect your skin’s pH, and always layer like a forensic artist—not a finger painter. Now go forth and bleed responsibly.
Like a Tamagotchi, your Halloween makeup needs daily care—except this one dies dramatically on November 1st.
Crimson drip falls slow—
Glycerin holds the truth now.
Skin breathes, costume white.