Ever tried crafting a gory wound only to end up looking like you lost a fight with crayons? Yeah, we’ve all been there. Let’s fix that mess.
Halloween is here, and if you’re ready to take your costume game to the next level, mastering special fx wounds can be your golden ticket. In this guide, we’ll walk you through everything from choosing materials to applying techniques so realistic they might send your grandma running for the first aid kit. You’ll learn how to create wounds that look professional without breaking the bank—and yes, we’ll share some painfully funny fails along the way.
Table of Contents
- Why Special FX Wounds Matter
- Step-by-Step Guide to Creating Realistic Wounds
- Top Tips for Perfecting Your Craft
- Real-Life Examples & Inspiration
- Frequently Asked Questions About Special FX Wounds
Key Takeaways
- Special FX wounds elevate any Halloween makeup look and require minimal tools.
- Achieve pro-level results by using affordable products and proper layering techniques.
- Gelatin, liquid latex, and face paints are your best friends—but more on that later.
- Practice makes perfect—start early to avoid last-minute panic attacks.
Why Do Special FX Wounds Matter?
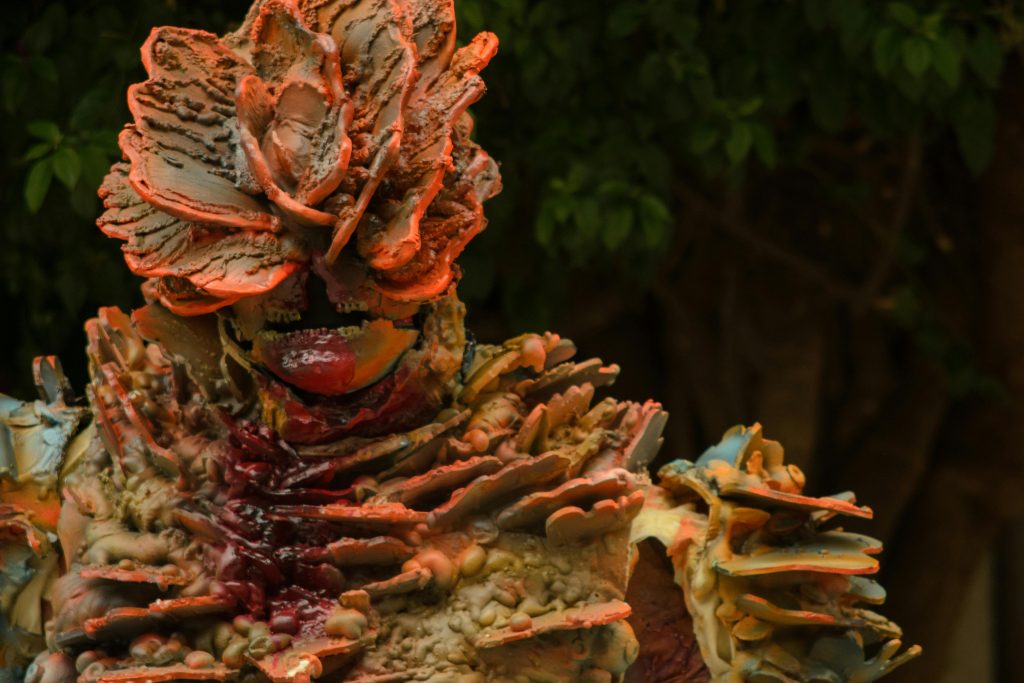
Let’s be honest: A zombie costume without bloody wounds is just someone in dirty clothes. Special FX wounds transform an ordinary getup into something truly memorable. Whether it’s a gruesome gunshot wound or a festering zombie bite, these details catch the eye and spark conversations.
Image description: A hyper-realistic open wound effect achieved using makeup techniques and gelatin-based prosthetics.
Optimist You: “Wow, I could totally nail this!”
Grumpy You: “Yeah… unless you forget the blending step and scare off innocent bystanders.”
Step-by-Step Guide to Creating Realistic Wounds
Step 1: Gather Your Materials
Before diving in, make sure you have these essentials:
- Gelatin sheets (or pre-made wound kits)
- Liquid latex
- Face paint (red, black, white)
- Palette knives or brushes
- Tissue paper or cotton balls for texture
I once used ketchup as blood substitute—spoiler alert: It was sticky AF and attracted bees. Don’t do that.
Step 2: Sculpt the Base Layer
Apply a thin layer of liquid latex to your skin and press tissue paper onto it while still wet. Once dry, rip away small sections to expose raw edges—perfect for simulating torn flesh.
Step 3: Add Color
Start layering colors with red at the center, blending outward with purples and blues around the edges. Finish with highlights of yellow and white near raised areas to mimic fresh damage.
Top Tips for Perfecting Your Craft
- Blend Like Your Life Depends On It: Harsh lines scream “fake,” so feather out edges meticulously.
- Use Cheap Ingredients Wisely: Gelatin from the grocery store works wonders when melted down correctly.
- Less Is More With Blood: Overdoing it turns gory into goofy faster than you’d think.
- Terrible Tip Disclaimer: Applying too much liquid latex WILL RIP OUT HAIR. Please trim excess hair or prepare for tears.
Rant Corner: Why Pre-Made Prosthetics Often Fall Flat
Listen, I love convenience as much as anyone, but those cheap drugstore prosthetic wounds? Total trash fire. They never sit right, feel stiff, and often slide halfway down your face mid-party. Spend a little extra time DIY-ing instead—it’s worth the effort.
Real-Life Examples & Inspiration
Remember Ariana Grande’s iconic “God Is A Woman” performance where she turned into a goddess with glowing veins? That same concept applies here. From Hollywood blockbusters to viral TikTok trends, stunning special fx wounds prove one thing: Creativity knows no bounds!
Frequently Asked Questions About Special FX Wounds
Q: Can I use food items like chocolate syrup for fake blood?
Absolutely! Chocolate syrup mixed with corn syrup creates a sticky, dark red shade perfect for horror vibes. Just don’t lick it during application.
Q: Are there vegan-friendly alternatives for creating lifelike wounds?
Yes! Most modern FX supplies skip animal-derived ingredients. Check labels carefully if you’re aiming for cruelty-free projects.
Q: How long does it take to master this skill?
Depends! Some folks nail simple effects within hours; others spend years perfecting intricate designs. Either way, practice pays off big time.
Conclusion
Creating special fx wounds isn’t rocket science—but damn, does it feel like wizardry when done right. We covered essential steps, shared insider tips, and laughed about our glorious fails together. Now go forth and terrify strangers responsibly!
Like a Tamagotchi, your Halloween makeup skills need daily care. So grab those supplies and start experimenting—you’ve got this!